
Sunday, October 21, 2012
Hmmm.......What to do......
I made a bunch of various sized soap balls with left over soap. Now I have to think of a creative way of using them. Just tossing them into a batch of soap sounds too simplistic and ordinary. It would look pretty with the different colored circles in the sliced soap but I am going to try to think of something different. Any ideas? The larger balls to the left are all of the colors combined. Bet they will look really neat inside.

Saturday, October 13, 2012
Updated Website
I have worked very hard to update my Weebly Website. I still have the Lily site, https://lilyshop.com/store/LydiaMariesBoutique but need to update that as well.
The Weebly site had been under the Pocket Full of Sunshine Boutique name and since I couldn't just change the name, had to build a new site. I incorporated a collage of many previously made products as the header of most pages.
Check it out here http://lydiamaries.weebly.com
The Weebly site had been under the Pocket Full of Sunshine Boutique name and since I couldn't just change the name, had to build a new site. I incorporated a collage of many previously made products as the header of most pages.
Check it out here http://lydiamaries.weebly.com
Saturday, October 6, 2012
Oh no!!.......Oh yes! More Soap Cupcakes!!!
I could seriously make soap cupcakes every day of my life!!! These are sooo much fun to make. I need to spend a day making decorative embellishments. I should also plan ahead, deciding what fragrance and design I am going to make ahead of time, so I am prepared. As of now, I just fly by the seat of my pants and am not as creative as I might be otherwise.
Here are my latest creations:


Here are my latest creations:

Japanese Cherry Blossom

Blackberry Amber

Cabernet Sauvignon

Dead Sea Mud & Salt Spa Soapcake
These will be ready to sample in 2 weeks. I am anxious to try them out, especially the Spa Soapcake. I made a bar soap some time ago with this same recipe but I put salt in the bottom layer, which crumbled when I cut it. So, this time, I put a plain layer of soap first, followed by a layer with salt and then a layer with the Dead Sea Mud. Not that is matters with this design, since I won't be cutting these.
Sunday, September 9, 2012
Going Crazy With Soap Cupcakes
It has been quite some time since I posted. I have mentioned in the past that I was having some health problems. Unfortunately, this has been a prolonged challenge. I was finally able to have a couple of days of feeling well enough to play. I am on a CUPCAKE kick!!! Here's some pics.


Scented with Wedding Cake Fragrance Oil. My flower making skills are not the best, but, with anything, practice makes perfect. Piping with soap is much different than piping with icing!

Scented with Wedding Cake Fragrance Oil. Simple but elegant.

Scented with Juniper Breeze Fragrance Oil.

Scented with Jack Frost Fragrance Oil.

Scented with Gingerbread Fragrance Oil.

Scented with Peppermint Stick Fragrance Oil.
Wednesday, August 22, 2012
Don't Judge A Book By It's Cover
I have made countless batches of soap over the years. Some have been prettier than others. Having said that, I will explain the title of this post.
I made a batch of soap about 5-6 months ago and scented it with Lavender and Eucalyptus Essential Oils. I added green and purple colors, as seemed appropriate for the fragrance. Initially, I was pleased, however, over the months the colors faded. I eventually tossed the soaps into a box which was labeled "Eucalyptus Lavender -- Yuck -- Ugly". The purpose of the label was to alert me to soaps for either personal use, or, to "repurpose" at a later date. By repurpose, I am referring to adding the soap to a new batch to make it more pleasing to the eye. Here is a picture of the soap.

When shower time arrived this evening, I wandered to the basement to fetch a new bar of soap. I spied the box of "ugly" Eucalyptus Lavender soap so decided that was my choice.
First, I want to say I just LOVE essential oils! While I appreciate the variety of scents afforded by fragrance oils there is just no substitute for good ole fashioned essential oils! It is just so fresh and uplifting, not to mention the beneficial properties.
Well! The soap lathered beautifully and the aroma was delightful! So while maybe it isn't the prettiest thing to look at, it was pure pleasure to use and left my skin smooth and soft.
Monday, August 13, 2012
Update Coming Soon
Sorry I have been MIA lately. I have been working a lot at my day job, busy with family functions and having some minor health issues. I am anxious to spend some time on new creations over the next couple of days and will post details and pics as soon as I can.
Wednesday, July 18, 2012
New Melt and Pour Base Experiment
In my last post, I wrote about a new venture. Making my own melt and pour soap base. While I accomplished my mission, I was not overly thrilled with the recipe itself. Having been a soap maker for many years, and never tiring of the endless combinations of oils and butters when creating soap recipes, the recipe provided in the book I purchased for melt and pour soap base from scratch did not include ANY oils or butters. Huh? How could it even be soap? So, I continued my journey to find a true SOAP that could be made, melted and poured.
The key ingredient in any melt and pour soap is propylene glycol. As with every other ingredient on the earth, there are no doubt "studies" that have been done, deeming this ingredient as skin "unfriendly". There are just as many articles declaring it's benefits and safety. Regardless, this product is what makes the soap base meltable.
I didn't have enough of said propylene glycol for the recipe I found, but, being the impatient person I am, decided to make it anyway, using the amount of propylene I had, to see how it would work out.
I soon discovered the resultant glitch from not having enough. After the soap was made, it wanted to skin over immediately as soon as I stopped stirring it. Not to be thwarted, I continued on.Into the mold it went.

Giving in yet again to my impatience, I popped the little darling into the freezer until it had sufficiently hardened that I could remove it from the mold.

Doesn't look too bad. Glad the yellow color toned down a bit. Now, to see if it will cut easily and remelt?

Yes! Nice and soft. Cut easily. Now. Will it melt?

Yes! However, can you see the skin on top? THAT is the thorn in my side, but, reminding myself this is an experiment.

I added some color, just for the sake of adding color. Didn't bother with fragrance. That skin is really starting to annoy me!

In the mold and then, yes, you guessed it! Into the freezer. lol

It came out of the mold easily, even tho it was still warm. (I did mention I was impatient, didn't I?)

It lathered good. Hmmm. What's this? My hands felt "sticky" when I was done washing my hands. Too much glycerin? Hmm. Then, a few minutes later, I realized the sticky feeling was gone and in it's place, my hands felt very soft and moisturized; as if I had put lotion on. Hmmm.
All in all, this was a successful project. I learned a lot. I have taken a giant step towards developing the most incredible melt and pour base on the planet. Well, maybe not that good, but really good! I DEMAND perfection. Stay tuned but don't hold your breath! My experimentation must be placed on the back burner for a few days while I work long hours at my day job.
Tuesday, July 17, 2012
Soaps Made with Scratch M & P Base
My initial Mad Scientist session is completed. Clear and White melt and pour bases made from scratch - noted in the previous post. Now, the final product.
 These are little soaps made with the White Base. As you can see, they colored a beautiful pastel color. The base is very very white. The soaps unmolded like a dream, only requiring the slightest pressure on the back of the mold. Beautiful if I do say so myself!
 I was pleasantly surprised when the clear base accepted the color so well, considering the color of the base was light amber instead of clear. This base required the tiniest bit more pressure on the back of the mold to release, however, I have a feeling this was because of impatience on my part and being in a hurry to unmold. They were still slightly warm.
Now for the all important suds factor. As previously noted, the clear base was a recipe named High Sudz.

I found it to create a creamy lotion like lather after a vigerous 30 second hand rubbing. Not at all what I would consider "High Sudz". A bit of a disappointment in my opinion.
The White base fared better.
 A nice fluffy lather after only a few seconds of rubbing. This one is a keeper.
I will work on reformulating the clear recipe and work on a recipe for a base with additives such as oils and butters. The above recipes were simple, basic recipes.


Now for the all important suds factor. As previously noted, the clear base was a recipe named High Sudz.

I found it to create a creamy lotion like lather after a vigerous 30 second hand rubbing. Not at all what I would consider "High Sudz". A bit of a disappointment in my opinion.
The White base fared better.

I will work on reformulating the clear recipe and work on a recipe for a base with additives such as oils and butters. The above recipes were simple, basic recipes.
My First Made From Scratch Melt and Pour Base
Here it is! Not as difficult as I expected nor was the end result as I expected. Since I had only ordered enough ingredients to make 1 full batch (10 pounds) of soap, I decided to make half of 2 different recipes. I chose a high suds clear and a white base. I made the high suds first and was disappointed when the end result was light yellow instead of clear, as I had expected.
 As you can see, it is nice and clear, but, it's yellow! I don't know if that is how it was supposed to turn out of if I did something incorrectly. I followed the directions precisely. There are no oils in the recipe, so, I can't blame it on that. The soap is sitting, hardening as I write. I will give it a try a bit later today and post pics of the end result.
I moved on the the white base, which was very similar to the clear, high suds, with the addition of Titanium Dioxide.
 At the suggestion of the author of the book, I added two extra ingredients after the heating process was completed, to ensure a nice hard bar. Well, that was a mistake. The soap hardens too quickly and will be difficult to use creatively in certain situations. Having said that, of course I will be giving it a try as soon as it hardens, and will post the results.
Since the available information pertaining to the creation of one's own melt and pour soap bases is limited, I plan to do some serious tweaking of the recipes I have and make that information available to the public. Stay tuned!

I moved on the the white base, which was very similar to the clear, high suds, with the addition of Titanium Dioxide.

Since the available information pertaining to the creation of one's own melt and pour soap bases is limited, I plan to do some serious tweaking of the recipes I have and make that information available to the public. Stay tuned!
Monday, July 16, 2012
Expecting Ingredients Today
Finally, my shipment of ingredients should arrive today; after I have left for work, of course!!!
I do still work a full time day job (RN), but am working hard at new products, marketing and looking into opening a retail store. As God provides and things fall into place, I will be able to work full time making and selling my products and will be able to leave my day job behind.
Creating my own melt and pour soap base is taking a huge step in making my products truly my own. I am very excited about having the power to control what is in my glycerin soaps, the same as I am for the other products I make. Stay tuned for updates coming soon!
All Natural Products
With many customers preferring all natural products, finding a natural substitute for synthetic ingredients can be challenging. Unfortunately, with the enormous amount of information available on the internet, it is just as easy to become MIS-informed as it is INformed. Things are blown out of proportion, correct information distorted, things taken out of context and false information passed along as set in stone truth. Some mis-information is intentionally spread by malicious individuals to negatively impact the ever growning small business community, particularly with regard to handmade bath, body and beauty products.
Launching an all natural product line is on my radar but still in the formulation phase. I hope to present it later this year.
Thursday, July 5, 2012
Branching Out
Over the course of my many years of making soap I have worked primarily with Cold Process Soap. I have created many different recipes and used endless combinations of oils and butters. I have managed to become increasingly creative in my designs and have many more ideas and designs in the works.
I also love melt and pour soaps because the creativity is endless. Mistakes are easily corrected by simply melting the soap and starting over. To date, I have used pre-made bases. After doing considerable research, I have decided to start making my own melt and pour base. Doing so will allow me to use only the ingredients I want in my soap and to create a more skin friendly product. I have ordered the necessary ingredients and should have them in time to give this a whirl the end of next week when I have a couple of days off from my day job. I will post my adventures, pics and updates.
I also love melt and pour soaps because the creativity is endless. Mistakes are easily corrected by simply melting the soap and starting over. To date, I have used pre-made bases. After doing considerable research, I have decided to start making my own melt and pour base. Doing so will allow me to use only the ingredients I want in my soap and to create a more skin friendly product. I have ordered the necessary ingredients and should have them in time to give this a whirl the end of next week when I have a couple of days off from my day job. I will post my adventures, pics and updates.
Wednesday, June 27, 2012
Recent Soap Projects
I love making soaps freehand. No, they aren't as perfect as soaps made with molds, but, I simply enjoy the art of making a truly unique, one of a kind design. Here are a few of my recent projects.


This is a full loaf of soap. It was challenging to make it so every slice would be the same. This is scented with Hansel and Gretel's House Fragrance Oil which is a delightful Gingerbread fragrance. Not a sharp gingerbread but a very smooth, mellow gingerbread fragrance. I love it so much I made a second house with it.

This is the first Gingerbread House sliced.

My second Gingerbread House Soap, also scented with the Hansel and Gretel's House fragrance oil.

Here it is sliced. I went back and added the yellow trim at the top to each slice. Didn't get a picture of all of them together tho.

This one was really tricky because it is difficult to get each of the embeds sized correctly. For anyone who works with melt and pour soap, you know thin or small details in a design are prone to melting when hot soap is poured around it. The vase in this soap is larger than I wanted and the mirror added a good bit of height, resulting in a larger soap than I anticipated.

Here is the Fireplace soap sliced. This is scented with Twilight in the Woods Fragrance Oil.

This design really drove me nuts. I had to cut each component seperately and then "glue" them together with soap. As you can see, it turned out a bit crooked and off center. It is supposed to be a lava lamp, for those who are trying to figure out what in the world it is. It is scented with Sands of Morocco Fragrance Oil.
Sunday, June 3, 2012
How to Groom Soap
Every soap maker has made soap that had flaws. The most common one is air pockets. This problem is easily corrected if you tend to the problem as soon as the soap is removed from the mold. When first removed from the mold, the soap is obviously firm, but, is still malleable. I will post pictures of how to fill in air pockets. This process must be done immediately upon removing soap from the mold, before the soap begins to dry. Otherwise, the soap patching will not adhere. Feel free to post any questions you might have.


Soap with air pockets

End piece from loaf of soap
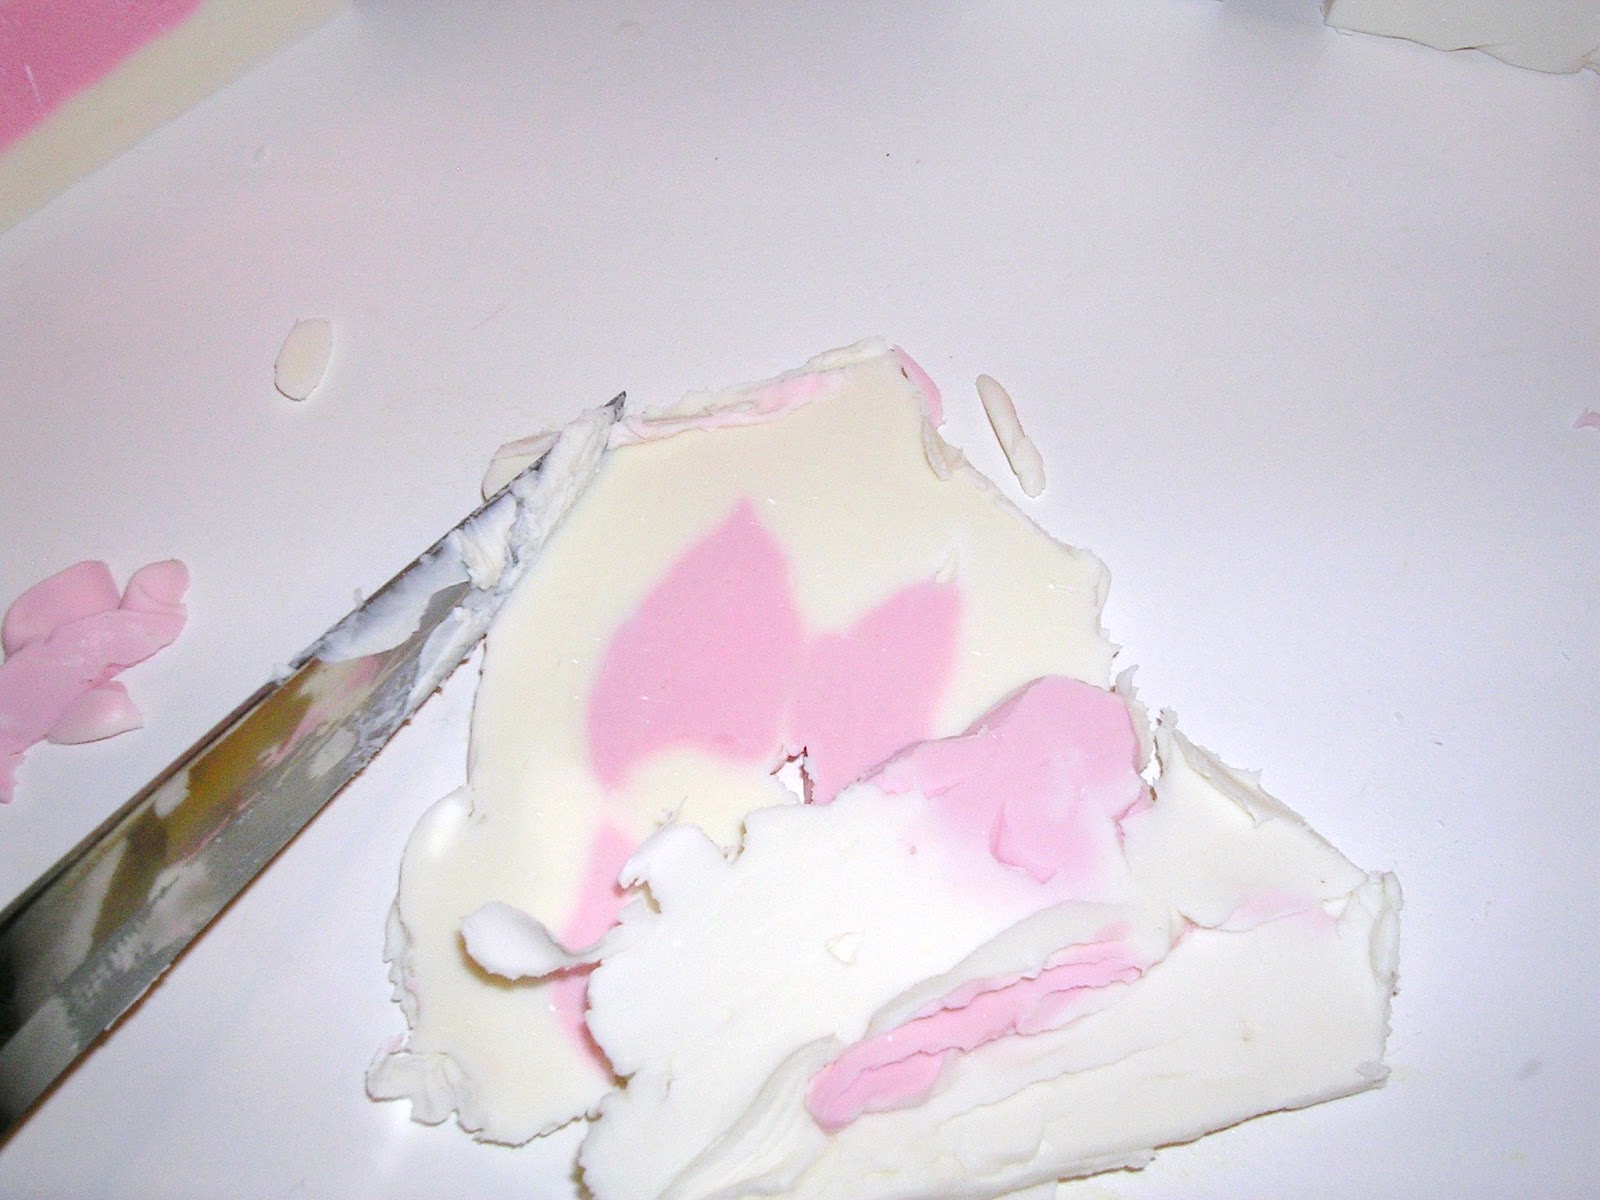
Cut small amount of soap from end piece

Press into air pocket

press firmly

Smooth with knife

keep smoothing with steady pressure

Leave soap to harden, then trim irregularities
Tuesday, May 29, 2012
Melt and Pour Soap
It has been a while since I posted. I have been very busy making soaps. The past week or so I have been playing around with melt and pour. I love being unique and creative. I only use molds when absolutely necessary, prefering to freehand my designs, to make sure they are original and unique. I will post a few pics.


Denim Fragrance Oil

Hot Pink Lime Fragrance Oil

Just Peachy Fragrance Oil

Strawberries & Champagne Fragrance Oil
Tuesday, April 10, 2012
More Soaps
Hope I'm not boring you. Here are a few more soap pics.


 Midnight Pomegranate

Coconut Lime

Awapuhi Seaberry

Chamomile Lavender

Monday, April 9, 2012


Subscribe to:
Posts (Atom)