I set out to make a batch of soap this afternoon. I planned to divide the batch in three parts so I could make a loaf of three different fragrances. I chose Sunflowers and Sunshine, Cherry Blossom and Cabernet Sauvignon Wine.
I mixed the lye water and set it aside to cool. Then, I mixed lye water for a very small batch of whipped soap, which I planned to use as icing for cupcake soaps I made yesterday. I put some cold water in a bowl and set the small container of lye water down in it to cool it. I made the whipped soap, iced the cupcakes and moved on to make the large batch of soap.
The soap seemed to take longer to trace than usual, but, eventually thickened. The colors seemed extraordinarily bright and did not seem to be "morphed" by the lye as it sometimes is. I took special pains to design the soaps more intricately and beautiful than I generally take the time to do. They were PERFECT!!! I could hardly wait until tomorrow to unmold and cut them.
Then, I started the clean-up. As I was gathering bowls, spoons, spatula's, etc., I saw a container of water sitting on the washing machine. I was puzzled. I distinctly remembered putting the lye water in the soap, but the water in the bowl looked like lye water.
I returned to my beautiful loaves of soap and took a small smear of soap that was on the side of the mold and rubbed it onto a small cut on my hand. It didn't sting like fresh made soap always does. I ventured further and did the "tongue test". I took a tiny bit of the fresh made soap and stuck my tongue on it. It didn't "bite". I was still puzzled. Then it hit me like a ton of bricks. My heart sank! The "lye water" I had added to my batch of soap was the bowl of water I had used to cool my small container of lye water when I was preparing to make the whipped soap! My beautiful soap was not soap at all. There was no lye in it!!!!
No time for a pity party. I had to try to save my soap. I knew that adding the lye water would result in the soap having far too much liquid in it since I had already put water in it. This results in the soap taking longer to cure, and, will result in more shrinkage. So be it. I also knew the soap would end up being all one color instead of the beautiful swirls and layers I had initially created. So, I decided to make a small batch of soap so I could at least add a bit of white to the original soap, for contrast. I mixed another batch of lye water and only used half of the recommended amount of water. I wanted to add the least amount of water I could to the already "over watered" soap. It is not uncommon to "water discount" or use SLIGHTLY less water than the recipe calls for, to help speed up the curing and drying process. I have done this many times over the years. But, cutting it in half was a MISTAKE!!!! It resulted in the soap heating up excessively and it immediately seized on me. (Got hard immediately). So, after adding the lye to my three separate soaps and getting them to trace, I poured them into the molds and added chunks of my seized soap. Another MISTAKE!!! The extremely hot seized soap heated the whole loaf, causing it to separate!

Now what???!!!! I dumped the soap back into the bowl.
Looks like bloody brains doesn't it?
I started praying and stirring as hard and fast as I could. It was too thick and chunky to use the stick blender.
It pulled together and I returned it to the mold and stuck it in the freezer.
This is what it ended up looking like. Not at all what I had designed the first time around, but, the soap was saved, Glory be to God! This was the Wine soap.
I thought the Cherry Blossom was OK because it looked OK on top. I pulled the side of the mold out and discovered a melted, separated mess underneath. It was much too chunky to stir, so, I threw it into the Crock Pot to soften it up.
I did't want to cook it too long because I didn't want to cook the fragrance out of it. Cooking soap is not foreign to me. I have done it before. (Hot Process soap making). I prefer Cold Process soap making, which is what I normally do. When doing hot process, the fragrance is always added after the cooking part is completed and the soap has cooled a bit.
I cooked it on high for about 20 minutes, stirring frequently. At this point, it was soft enough to stir and pulled together nicely. It still had a lot of chunks in it, but, that was OK.
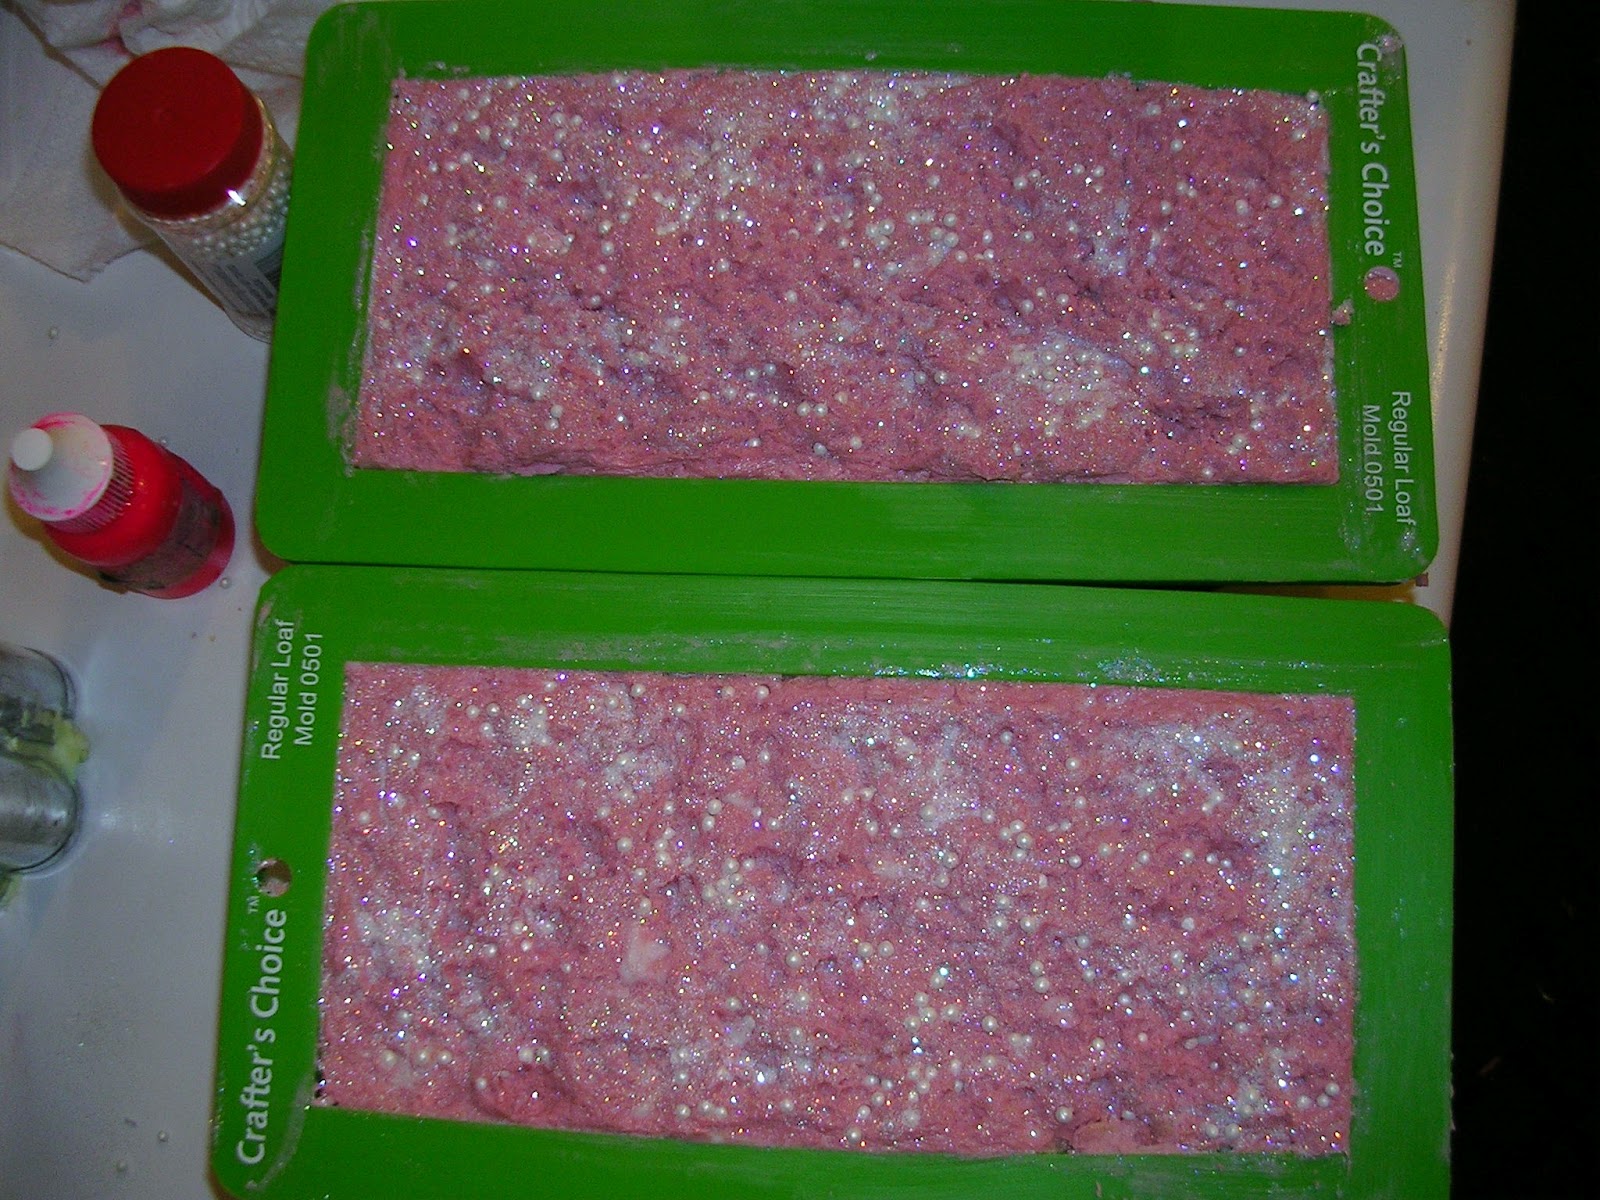
This pictures shows the Cherry Blossom soap, back in the mold. Dressed up a bit with candy pearls and some glitter. I added texture to the top by poking it with a piece of coral. Tomorrow I will be able to remove the soap from the mold and slice it. I will add a picture of the final product then.
I'm not sure what is going on with the Sunflowers and Sunshine loaf. That was the last loaf I "fixed" and by this time, the seized soap had cooled down considerably and the chunks I added did not cause the soap to heat up. I didn't have another loaf mold so poured it into a metal column mold. I can't peek at it to see what is under the hardened top. I think it is OK though. I will find out tomorrow when I unmold it.
In the event these efforts had failed to save my soap, my only other recourse would have been to rebatch. I explained this process in a previous post.
24 hours later:
This is the end product of the "saved" batch of Cherry Blossom soap. Not too bad if I do say so myself!!!!